Hello,
Welcome to my Blog Page, in this tutorial I am going to take you through the process of how to integrate push notification using FCM in flutter app part 2.
In this tutorial I will going to impart you about how to send notification form one device to another device. We will run some dart code to connect flutter app will firebase and send notification from one device to other.
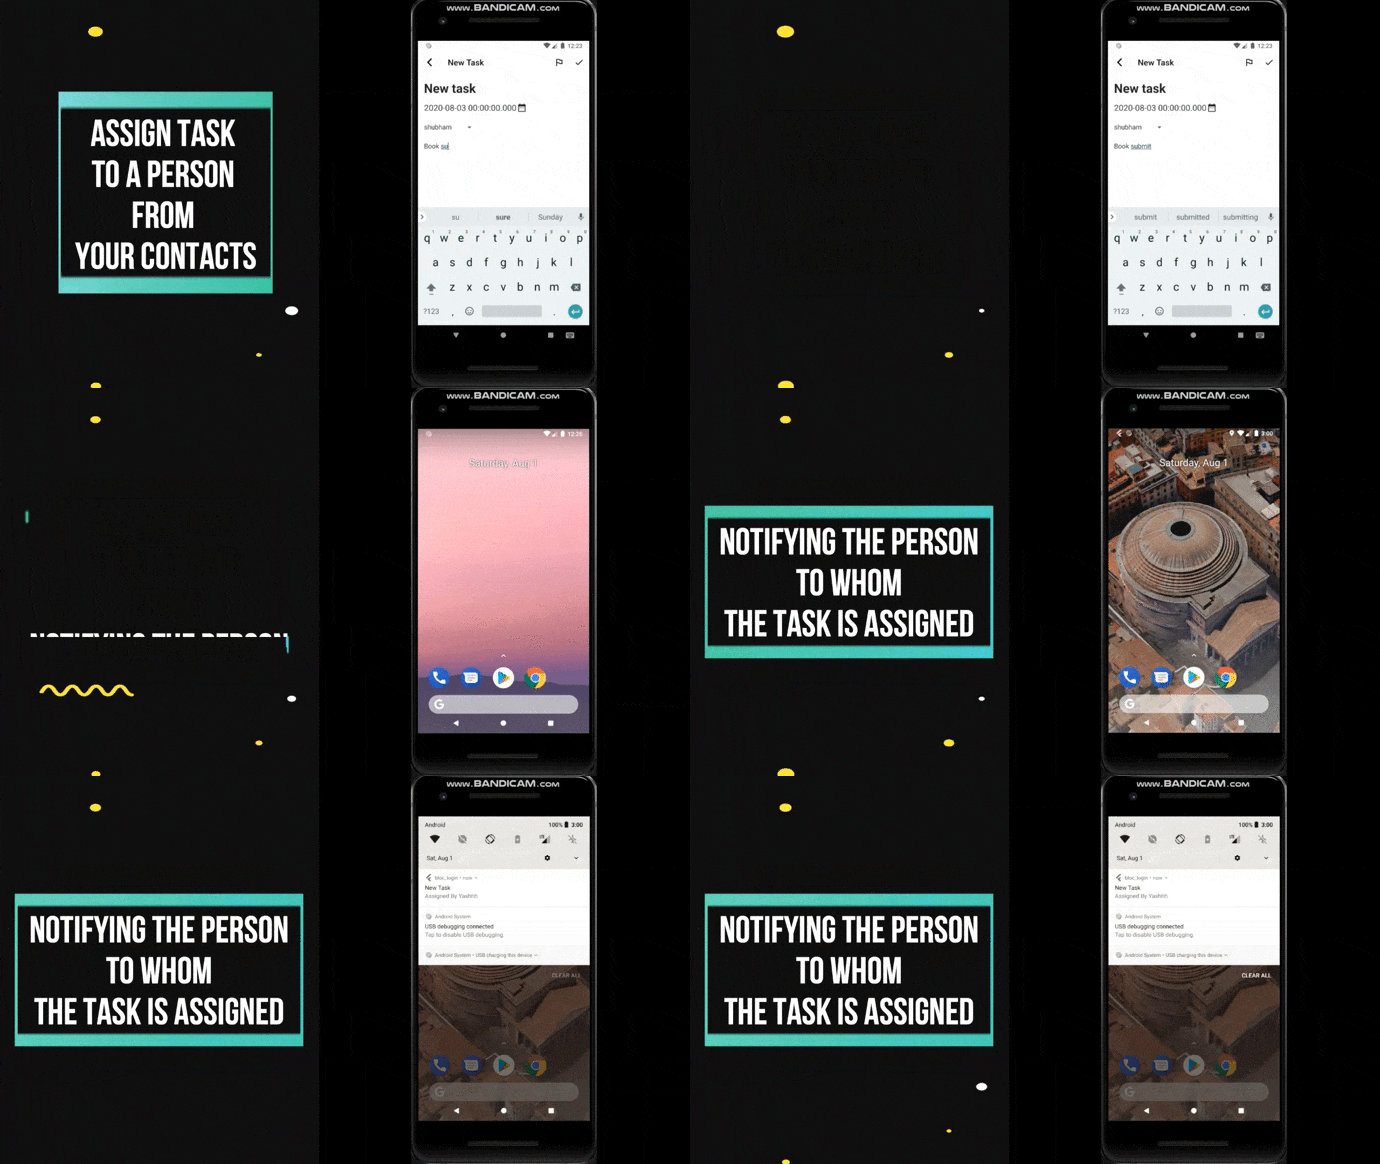
The application of this app is to make user notify about what task has been assigned and by whom.
This tutorial is divided into two parts: -
A) Setup Firebase project for cloud messaging.
B) Perform Push notification in flutter.
Note: - If you have already created create project in firebase then you can continue otherwise click here to refer last tutorial before starting this part of the tutorial.
Let’s Begin 🚀🚀
Note: - Initialize flutter project ready for FCM.
1) Open pubspec.yaml file
Go to file pubspec.yaml and enter latest firebase messaging dependencies. Click for latest dependencies.
dependencies:
  firebase_messaging: ^7.0.3
2) Setting Android-specific configuration.
So, on the android side we have to add google classpath to the file <project-name>/android/build.gragle.
 {
  // Example existing classpath
  classpath 'com.android.tools.build:gradle:3.5.3'
  // Add the google services classpath
  classpath 'com.google.gms:google-services:4.3.2'
}
3) Integrate Firebase Messaging with flutter
For that add google apply plugin to firebase-messaging dependency to the file <app-name>/android/app/build.gardle.
Note: You can find out what the latest version of the plugin is here Cloud Messaging.
dependencies {
implementation 'com.google.firebase:firebase-messaging:^6.0.13'
implementation "org.jetbrains.kotlin:kotlin-stdlib-jdk7:$kotlin_version"
}
ADD THIS AT THE BOTTOM
apply plugin: 'com.google.gms.google-services'
Note: When you are debugging on Android, use a device or AVD with Google Play services. Otherwise you will not be able to authenticate.
4) How Notification action take place
when the user clicks on a notification in the system tray include the following intent-filter within the tag of your android/app/src/main/AndroidManifest.xml.
<intent-filter>
    <action android:name="FLUTTER_NOTIFICATION_CLICK" />
    <category android:name="android.intent.category.DEFAULT" />
</intent-filter>
5) Creating java file called Application.java
Add an Application.java class to your app in the same directory as your MainActivity.java at path <app-name>/android/app/src/main/java/<app-organization-path>/.
package io.flutter.plugins.firebasemessagingexample;

import androidx.annotation.Keep;
import androidx.annotation.NonNull;
import io.flutter.embedding.engine.FlutterEngine;
import io.flutter.embedding.engine.plugins.shim.ShimPluginRegistry;

@Keep
public final class GeneratedPluginRegistrant {
  public static void registerWith(@NonNull FlutterEngine flutterEngine) {
    ShimPluginRegistry shimPluginRegistry = new ShimPluginRegistry(flutterEngine);
    flutterEngine.getPlugins().add(new flutter.plugins.contactsservice.contactsservice.ContactsServicePlugin());
    flutterEngine.getPlugins().add(new io.flutter.plugins.firebasemessaging.FirebaseMessagingPlugin());
      com.flutter.keyboardvisibility.KeyboardVisibilityPlugin.registerWith(shimPluginRegistry.registrarFor("com.flutter.keyboardvisibility.KeyboardVisibilityPlugin"));
    flutterEngine.getPlugins().add(new com.dexterous.flutterlocalnotifications.FlutterLocalNotificationsPlugin());
    flutterEngine.getPlugins().add(new io.flutter.plugins.sharedpreferences.SharedPreferencesPlugin());
  }
}
And it's Done!! We perfectly Initially our flutter project and it is now ready for FCM 🥳
Now Initializing part come in Action
The package in dart code to make our project work completely
Firstly, in our dart code we have to import the plugin.
Let’s instantiate it one by one.
1) Creation a class
This class help us to communicate this flutter app with Firebase messaging plugin.
import 'dart:convert';
import 'package:http/http.dart';
import 'package:meta/meta.dart';
import 'package:firebase_messaging/firebase_messaging.dart';
class PushNotification {
final FirebaseMessaging _firebaseMessaging ;
PushNotification(this._firebaseMessaging);

@override
  void initState() {
    //super.initState();
    getmessage();
  }

  void getmessage() {
    _firebaseMessaging.requestNotificationPermissions(
        const IosNotificationSettings (sound: true, badge: true, alert: true));

    _firebaseMessaging.configure(
      onMessage: (Map<String, dynamic> message) async {
        print ("onMessage: $message");
      },
      onLaunch: (Map<String, dynamic> message) async {
        print("onLaunch: $message");
      },
      onResume: (Map<String, dynamic> message) async {
        print("onResume: $message");
   },
    );
}
  static final Client client = Client();
  static const String serverKey ='replace-with-google-token';

final String serverToken = '<Server-Token>';
final FirebaseMessaging firebaseMessaging = FirebaseMessaging();
  static Future<Response> sendTo ({
    @required String title,
    @required String body,
    @required String fcmToken,
  }) =>
      client.post(
    'https://fcm.googleapis.com/fcm/send',
     headers: <String, String>{
       'Content-Type': 'application/json',
       'Authorization': '$serverKey',
     },
     body: jsonEncode(
     <String, dynamic>{
       'notification': <String, dynamic>{
         'body': '$body',
         'title': '$title'
       },
       'priority': 'high',
       'data': <String, dynamic>{
         'click_action': 'FLUTTER_NOTIFICATION_CLICK',
         'id': '1',
         'status': 'done'
       },
       'to': '$fcmToken',
     },
    ),
  );

String title1;
  String body1;
  Future sendNotification(body1,title1) async {
    final response = await Messaging.sendTo(
      title: title1,
      body: body1,
      fcmToken:
          "Firebase-server-token-other-device",
    );
    if (response.statusCode != 200) {
      Scaffold.of(context).showSnackBar(SnackBar(
        content: Text(
            '[${response.statusCode}] Error message: ${response.body}'),
      ));
    }
  }
}
2) Initializing of class
This will make firebase plugin get activated.
class MyApp extends StatelessWidget{
    static final FirebaseMessaging _firebaseMessaging = FirebaseMessaging();
    Widget build(BuildContext context) {
        final pushNotification = PushNotification(_firebaseMessaging);
        pushNotification.getmessage();
        RaisedButton(
            child: const Text('Contacts list'),
             onPressed: pushNotification.sendNotification(
                 title= “Assigned by ABC”,
                 body= “Testiong task 2”
             ),
        ),
    }
}
Congratulations 🥳, we have successfully completed the coding part.
Now Testing time
Open terminal and write Futter run. To execute the project 🐱🏍
Here is the Output.

If you find this blog helpful then please give it a like..😊
Thanks for reading!!

